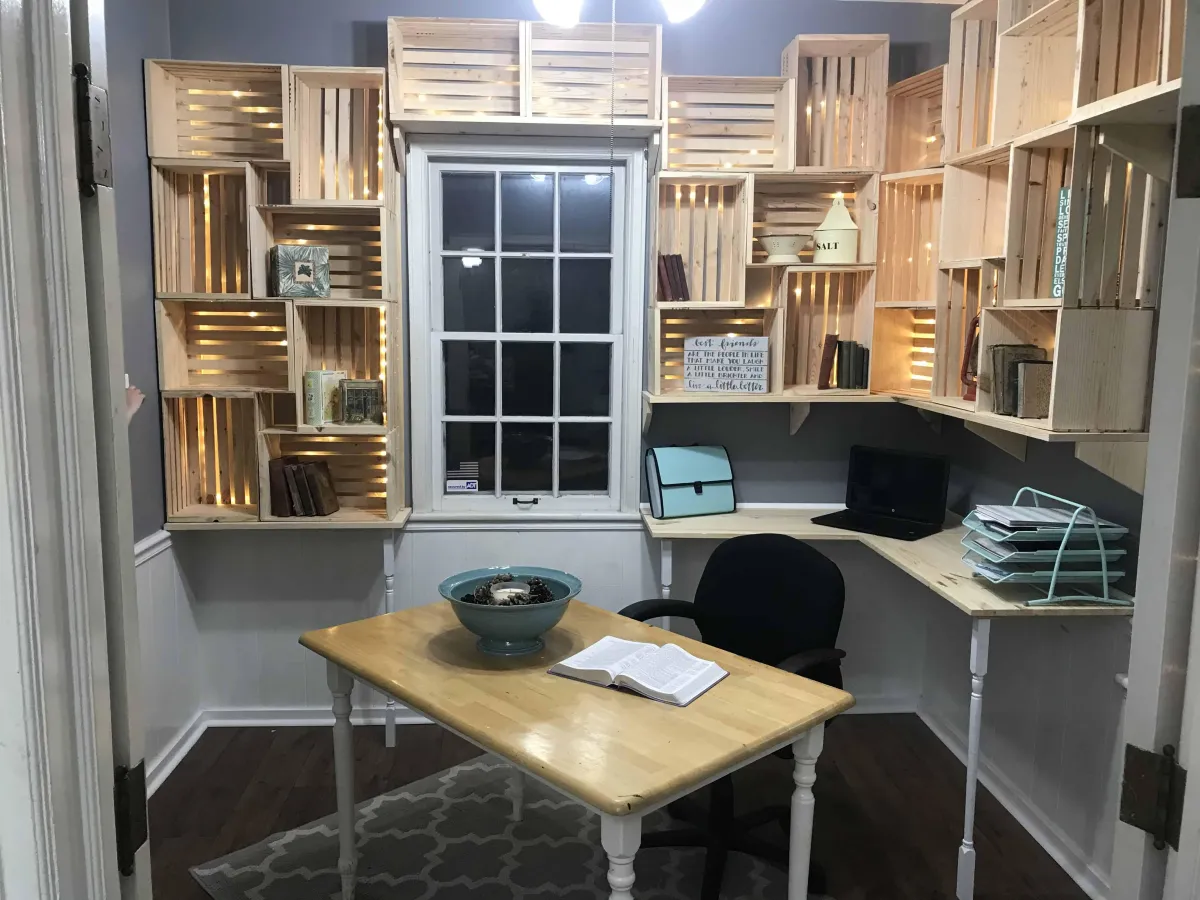
Say Goodbye to Boring Shelves - Make a Crate Bookshelf!
While I spent the week in Washington D.C. with our two youngest children, my husband surprised me with a completed home office upon my return.
I should preface this by saying I knew my husband planned to work on my office, I even knew his plans for it, but I figured this would not happen for several months still.
So, imagine my surprise when I came home to a beautifully finished office!
It was SO much better than I imagined it would be and I am so in love with my wooden crate bookshelves.
It’s the first thing our guests notice when they walk in our door.
It always shocks them to learn the wooden crates are homemade. But they’re so easy to make, anyone can tackle this DIY project for themselves.
Thankfully, Steve took a video log of all the steps he took to make the wood crates, how to assemble them, and also how to mount them to walls.
Steve took a few photos, but most everything you need will be in the video at the bottom of this post.
I’ll include pictures of supplies, the finished project, and a couple of pictures of how I filled the crate bookshelves when they were done.
I hope this inspires you to add some unique touches to your own space. 🙂
Supplies for a DIY Bookshelf:
3/4″ x 1/4″ Narrow Crown Staples (Steve used these to attach the lath to the ends of the crates.)
1″ x 10″ x 8′ Standard Pine (Steve used these for the sides of each crate.)
5/16 in. x 1-1/2 in. x 4 ft Wood Lath (Steve was able to get 7-8 crates out of one bundle.)
Some of the links in this post may be affiliate links, you can read my full disclosure here or look for more information at the bottom of this post.
Extra Supplies (not pictured):
(Optional)
Thoughts about this project:
Depending on what size you want your wooden crates, and how big the space you have to work with, will determine most of the materials you will need.
The supplies listed are what Steve used for my little office, which he talks about in more detail in the video.
(Steve added a corner desk and regular shelves above my windows that are not included in the supplies list.)
The pictures make the room look smaller than it is, but having the bookshelves off the floor really gives this room depth. What is normally a tight space feels spacious now.
The rope lighting is just the perfect touch. I love having it on at night; it gives a nice ambiance. Sometimes I just like to sit in my office with only the rope lights on and it’s pretty relaxing.
Finished Design:
Crates Filled in:
How-To Video:
Looking for some more DIY projects?
Add a Unique Look to your Walls with these DIY Canvas Frames
Remodeling Tips Every Homeowner Needs to Know
*As an Amazon Associate, I earn from qualifying purchases, but if I am recommending an item in my post, it is only because I have used it myself or have done enough research on the product to feel it is a good fit for my readers.
© 2023 Freedomkit | Powered by Freedomkit.ai

