DIY Half Bathroom Remodel
If you read my post about our basement remodel, you will remember just how gross the basement in our first home once looked. But that was nothing compared to what the adjoining half bathroom looked like. Believe it or not, it was even more dungeon-looking than the rest of the basement.
BEFORE:
Everything was old and wood-grained, although I was thankful the floor tiles were not the nasty ones from the rest of the basement. (It looked worse in person.) But the wallpaper and shower made up for it.
I could only bring myself to use this shower when it was absolutely essential. It totally gave me the creeps.
But I do have to say, once this room was remodeled, it was one of my very favorite rooms in the house!
Some of the links in this post may be affiliate links, you can read my full disclosure here or look for more information at the bottom of this post.
Demo
You’ll have to forgive the quality of these pictures as they were taken a few years ago, but you get the general idea of how desperately this poor thing needed an overhaul.
Gutting this space was a little challenging since it was a tiny half bath with little room to maneuver. My husband and I both worked in this room but the space was so limited I had to take the shower and he the bathroom.
Quite frankly, I think I got the raw end of the deal. Because whoever built the basement had a love for glue and used it every chance he could. And trying to remove old, glued-on shower liners from concrete was nearly an impossible task. It took days of chiseling.
I finally needed a break and made Mr. Muscles trade me jobs.
This was what it looked like when we finally got it down to the concrete. Because we were working on a budget and because we didn’t have the money to hire a professional to take the wall down, our remodel design had to include it. Which we weren’t thrilled about.
We took the walls down to the studs and updated the plumbing and electrical. We also pulled up the tile flooring.
Starting Over
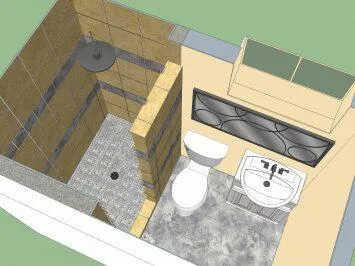
Before we do any remodeling in our homes, Steve will render the space into Sketch Up and work his magic. This program allows him to match measurements and see which layouts best fit the space. This way you get a good idea of how everything will look so you can change it before putting in the work if you need to.

Now that we knew what we wanted to do in the space, we got to work.
Drywall went up first and I had the wonderful job of mudding, sanding, and painting.
Everything seemed more challenging in such tight spaces but we made the best of it by taking turns. While Steve was at work, I was working here. Then he took over when he got home.
Since we prefer to do the work ourselves, almost every project we take on is a DIY project. But when it came to all the tile work that needed doing, we realized it would take us far too long to do on our own. (We had just remodeled our upstairs bathroom and did the tile work ourselves, so we knew how much work went into it.)
Thankfully we had friends who did tile in their construction business so we called them in and they had this place beautified in no time. Believe me when I say it was money well spent!
Plus, we were able to use leftover tile from our bathroom remodel upstairs and combined it with a much cheaper tile to complete the look.
Once the tile work was complete, all that was left to do was paint and install the toilet, sink, and fixtures. I used Behr Marquee paint on the walls; I never paint without it.
AFTER:
When it came to finding the right pieces to put in our half bathroom, we had a few obstacles to consider. One was the size of the bathroom. The second was the window that limited what room we had for a mirror.
I wanted to make the small space feel larger but we also didn’t want to spend a lot. Thankfully, I came across these double mirrors while running errands and convinced my husband they were the right choice. He was not sold on using two mirrors, especially in a small space, but once everything was put together, he loved it.
And if you notice, the final product was very close to Steve’s original design.
The shower side of the half bath felt massive and luxurious now that it was all fresh and we added some canned lights overhead. I couldn’t get over how large it felt, even though we kept the same square footage as before.
We put our house on the market within a couple of weeks of finishing this room and it was the most talked-about room among the people who came for showings. They were surprised at how big the space felt once they were in it.
We loved the finished product so much and were sad we only had a few short weeks to enjoy it.
Who knew something so hideous could turn into a real show-stopper!
Don’t forget to check out the rest of our basement renovations:
Basement Remodel in DIY Fashion
*As an Amazon Associate, I earn from qualifying purchases, but if I am recommending an item in my post, it is only because I have used it myself or have done enough research on the product to feel it is a good fit for my readers.
© 2023 Freedomkit | Powered by Freedomkit.ai

