DIY Laundry Room Refresh
If you read my post about our DIY Basement Remodel, then you already know about my aversion to the basement in our first home. It was dark, seriously outdated and I hated being down there.
But it was where my laundry room was located so I really didn’t have a choice in the matter. The only plus side my laundry room offered was it’s massive size and ample room for storage. Which we took full advantage of once we began our remodel. I can’t wait to show you the pictures!
But first, this was what our laundry room looked like before hand:
I’m sorry for the awful lighting and grainy photo but it should give you the general idea of what I saw everyday I did laundry.
When we were getting our house ready to sell, we knew we needed to update as much as possible but we were also on a budget. So our overall goal for this room was to update the existing elements (flooring, paint, etc.) and add some custom built-ins that my husband designed for the space.
Some of the links in this post may be affiliate links, you can read my full disclosure here or look for more information at the bottom of this post.
Floors
We started with the flooring first which meant we had to pull up the awful brown tiles. This revealed some patches of mold so we talked to some professionals and they recommended using Kilz. We have used Kilz before on other projects and love how effective it is. So we applied it to the floors and walls with two coats.
After this dried, we added a light grey coat of Behr Marquee paint, my favorite brand of paint. (Did you know it really covers in just one coat?!)
Because we were both busy with the painting, there was no one to capture pictures of all our hard work. 🙂

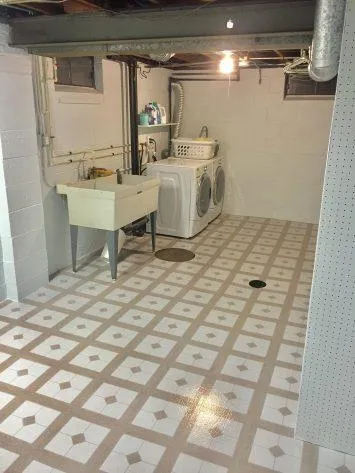
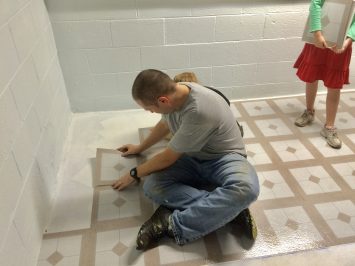
Next, we bought the most budget-friendly peel-and-stick tile we could find that also went well with the wall color. You can’t tell from the pics, but there are blue flecks in the tile that matched the paint on the walls perfectly. It was a nice find. (peel-and-stick tile has really come a long way and is a great, cost-effective way to update a space.)
As you can see, we had three little helpers to make the process go faster. 🙂
I couldn’t believe how much a coat of paint and new flooring transformed this space! It was shocking to me and I couldn’t stop going down there to admire it. In fact, I actually enjoyed doing my laundry. 🙂
Storage Room
This next pic is of the opposite side of the laundry room where we stored our things.
Steve wanted to utilize this space better so he designed a tote storage rack that would allow us to store all our totes and still give us easy access to each one. I absolutely loved the finished result and made him promise to make me one at our new home.
Laundry Sorter
Steve also wanted to utilize the space in front of our washer and dryer so he designed a folding station and basket racket which turned out amazing! I loved having my baskets off the floor so I wasn’t as worried about spiders or centipedes jumping out at me. Plus, this made everything easy to organize and made the space look so nice.
This was another design I made him promise to implement in my new laundry room.
After the remodel was complete, I was so in love with the space I was having a hard time wanting to let it go. haha!
This is the pic our realtor used for our listing and I think it does a great job of capturing our DIY laundry room remodel.
Seeing this bright, cheery room, it’s hard to imagine that it ever looked like the dark and dreary space you saw in the first picture.
After all the work we put into our basement, the new homeowners really got a brand new home with double the space. I was happy for them but I was even happier our hard work paid off when we accepted an offer well above the asking price.
Have you checked out our other DIY projects?
Small Bathroom Demo and Remodel
*As an Amazon Associate, I earn from qualifying purchases, but if I am recommending an item in my post, it is only because I have used it myself or have done enough research on the product to feel it is a good fit for my readers.
© 2023 Freedomkit | Powered by Freedomkit.ai

