
Create a Beautiful Daily Planner in this PowerPoint Tutorial
Planners are probably one of the most popular printables to make aside from wall art. If you were to do a search for printable planners, you will find an array of calendar templates, weekly planners, and monthly calendars, just for starters. And each of those is built upon for more in-depth planners that you can use for just about every stage of life.
It used to be that you could only buy paper planners in stores but now people can buy them online, print whatever pages from the planner they want, and build a more custom planner for themselves.
And, going one step further, there are now digital planners that you use solely on your devices. These aren’t even printed out. In this modern age, it’s actually a brilliant concept. But for those of us who prefer something tangible to write in, paper planners will never go out of style.
Regardless of which type you prefer, you’re here to learn how to create printables in PowerPoint so I’m going to remove some of the mystery around how that’s done. Today, I’m going to show you how to make a Daily Planner template and you can use these same techniques to flesh out a full planner if you wish.
(I sometimes include affiliate links, which means I might make a small commission off any purchases you make, at no additional cost to you. You can read my full disclosure here.)
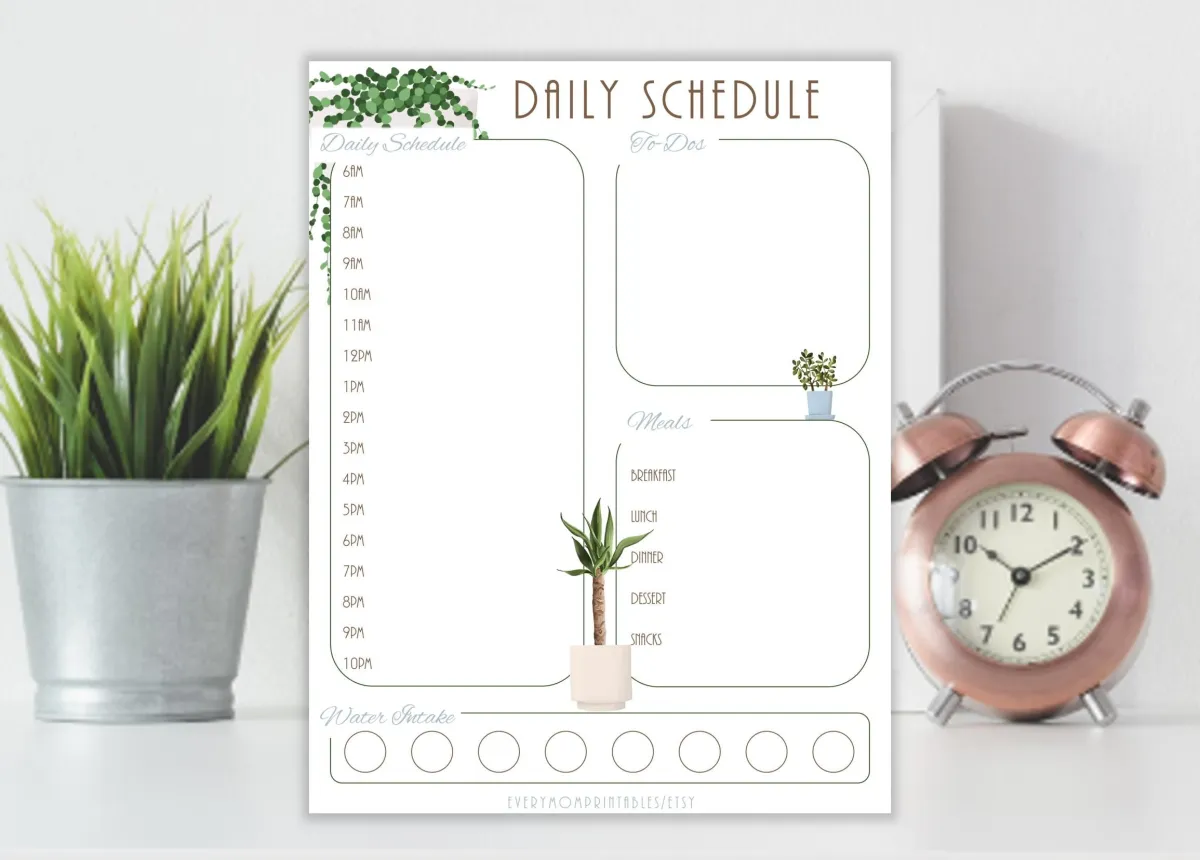
Below, you will find the daily schedule that I make in the video above. (I also sell it in my Etsy shop, Every Mom Printables.) We are going to use the same layout for this post.
Whether you are making a full-out planner or just a daily schedule, when you create printables for personal use, you can customize them to what you need. That’s one of the great things about learning how to do this. Everyone’s schedule and needs are different and you might have a hard time finding something that works seamlessly with your life. Making your own planner templates can give you that custom fit.
However, if you are making planners to sell, you won’t be able to customize them for every customer, unless that is a service you provide. For most of us content creators, it’s not feasible. So we make our planners as universal as we can. Once you’ve looked over dozens of schedule templates, you start to see a pattern of which elements are most used.
For example, in a daily planner, you might have sections for a daily schedule, daily activities, or tasks, as well as a timeline and a layout for meal planning. For a weekly schedule, there might be a section for key dates or meetings as well as a weekly calendar, etc., and so on for a monthly calendar.
Useful Tip: When creating planners to sell, it’s a great idea to make a couple variations. This provides your customer with options that might provide for a better fit.
How to Create a Daily Planner
1. Decide on the type of planner you want to make
You can make a planner for just about anything. If you need to get your creative juices flowing, I’ve created a list of some of the types of planners you might find available.
Types of Planners:
Organization
Holiday
Cleaning
Home Management
Medical
Fitness
Prayer
Shopping
Budget
End of Life
Pet
School
Another great thing about making your own planners is that you can create a planner template and then reuse many of the same pages for multiple planners, just change out the design and maybe some of the text. This is a great way to streamline your process and save time.

However, if creating planners seems like a monumental task but you really want to have them in your shop, you can always buy PRL planners. PRL stands for “Private Rights Label” and they are printables that you can purchase, re-edit and re-brand, then sell as your own. It’s a great way for new creators to get their foot in the door and it’s also a great time-saver. I usually make my own planners, however, if there is an area that I do not know well, I might buy that type of planner as a PRL and then build upon it.
I have bought and used planners from this PRL store and from here.
2. Choose a design style for your planner
As you look online for inspiration, you will find there are endless options in both functionality and design, when it comes to planners. Obviously, you are going to want to be creative and/or follow trends, but if you want to be safe in your designs, you can always follow a minimalistic approach. Less color means less ink used in printing which can be a selling point for buyers. A customer can always add color to a minimalist planner with stickers, pens, etc. after purchase. Just something to keep in mind when you’re brainstorming design ideas.
3. Choose which program you want to use
There are countless software programs you can use to make printables. Canva Pro, Adobe InDesign, and even Microsoft Word. But my absolute favorite is PowerPoint. I have been using PowerPoint for a couple of years now, so making printables takes me no time at all. I love how easy PowerPoint is to use and that most people already have it on their computers.
Now that we have all the preliminaries out of the way, let’s dig in and make a daily planner template in PowerPoint.
How to Create a Planner Page in PowerPoint
Depending on which version you have, your PowerPoint might look slightly different from mine, but you should be able to adjust these instructions to your version easily enough.
1. Size your slide to your paper dimensions
There are a few dimensions to consider when making your planner. For the best customer reach, you might want to make your planner in a few different sizes. The most common sizes are US letter (8.5×11 in), A5 (5.8×8.3 in), and half-page (8.5 x 5.5 in). For today, we are making our planner in US letter size.
PowerPoint was created for slide-show presentations, but we won’t be using it for that since we are turning the slides into printables. So, when we start each project, we want to change the slide size to our page dimensions.

You do this by heading to your “Design Tab” > select “Slide Size” option > select “Custom Slide Size” from the drop-down menu > from the pop-up, select “Custom” from the drop-down menu > add in proper dimensions in “width” and “height” > Select “portrait” for both > click ok > Select “Ensure Fit” from the pop-up window. (Here’s a step-by-step tutorial with separate screenshots.)
2. Add in the shapes that will make up your planner page
If you look at the pic below, you’ll see shapes inside each of the red circles. The core of what you’ll use in PowerPoint when making printables will be shapes and fonts. When you look at printables in this light, the creative process makes more sense.

To add shapes to your slide, you will head over to the “Insert” tab > click “Shapes” > select the shape you want from the drop-down menu > click and hold the cursor where you want the shape to start then drag the cursor, letting go where you want the shape to end > adjust the size in the top right corner or by right-clicking on the shape itself, or by clicking on one of the white circles and dragging it in the direction you want.

Once you have your first shape up, you will want to edit both the fill and outline color as well as the width of your outline. You can access all those options when you right-click on the shape. When I’m making a planner, I usually change the “fill” to white or “no fill” and only leave the “outline” with color, then adjust the width of the outline. But have fun trying out different styles, colors, and shapes!
3. Add text to your shapes
In the daily schedule we are using in this blog post, we use a text box for the title, the captions for each shape, and for the list of times and meals. Obviously, that is just a basic schedule and you can change it up in countless ways. Fonts are so much fun to play around with; I recommend browsing through fonts to find a couple that fit the feel of your planner. Using contrasting fonts on a page can give it a nice dimension and helps break things up. (Check out How to Upload Fonts in PowerPoint if you want to use fonts not already included in PowerPoint.)

4. Add graphics, clip art, or photos
This step is totally optional, especially if you are wanting a more clean look to your printable. But I’m a sucker for graphics and can’t seem to help myself. With this planner page, though, I think they give it a subtle touch of color and femininity. The three best places to find graphics and clip art, in my opinion, are Etsy, Creative Market, and Creative Fabrica (my personal favorite!).
Once you find a set you like, download it to your computer and upload it to your slide by heading to your “Insert” tab > select “Pictures” > choose “This Device” > find the file you saved the graphics to, select it, then select the graphics you want to use > click “Open”
(If you’d like a tutorial that walks you through the process step-by-step, click here.)

From here you can play around with where you want your graphics to end up. I show a few design options in my video above that you might want to see, just for visual reference. I also go into further detail on how to place your graphics so they complement your page, not compete with it.
Conclusion
Now that you have the basics down, you can create multiple planner pages. If you want to see the exact steps I used to create the daily schedule in this post, make sure to watch the video at the top. If you feel that you might like using PowerPoint to create your printables and want to learn more, check out my YouTube channel, Everything Printables, where I show you how to make all sorts of printables from calendars, and cards, to even games!
Related Articles
Create Stunning Wall Art in PowerPoint
Easily Make Note Cards in PowerPoint
PowerPoint Walkthrough
All About Printables and What you can do With Them

© 2023 Freedomkit | Powered by Freedomkit.ai